Thursday, 2 January 2014

A review of 2013

I have been meaning to post some kind of annual review for the last few years, but usually never get around to it. Right now, after a very busy year, I have a few quiet days in which to reflect on the past year and how it might relate to photography in museums.

I intend to use this blog as a personal notepad, of sorts. If I find something that is useful, or interesting, then I will attempt to post it here. There won't be detailed run-throughs of things, instead, notes and pointers on what to do. Hopefully readers can take these and experiment with them.

That said, here are my salient points from the past year:


  • Digital photography is now ubiquitous, and the rate of introduction of new models makes it almost impossible to recommend a specific piece of equipment. More interesting to me, is the fact that the earlier models of D-SLR can now be found on the secondhand market at extremely reasonable prices. Many of the examples for sale are in "enthusiast" condition, having been well cared for and with plenty of life left. These could be of use in setting up dedicated imaging stations, or putting a dedicated camera somewhere inaccessible and simply leaving it there for when it is needed. 
  • Early on in the year, Flickr increased their standard storage offering from 200Gb to 1Tb. To most people this means that every image from their cameraphone can be instantly stored in the cloud, forever. To museum imaging, this is a robust, mature, cloud delivery platform for free. If I upload one image of each collection object, say 10Mb in size, then I have capacity for roughly 100,000 objects. 
  • The Getty Institute released a large number of images, completely free, under their Open Content Program. A project I have been working on is in the process of releasing a large number of images of fossils.
  • I now have development machines running the three major operating systems - Mac OS X, Linux and Windows. More to come on this in the next year. 

Tuesday, 5 November 2013

Linux for museum imaging

I have ordered a cheap secondhand PC as I want to investigate if it can be upcycled to help with image processing.

The specs are a little laughable compared to modern standards, but part of the exercise is to work with easily obtainable kit. So, a quick summary:

  • Dell Optiplex 755 SFF, paired with an existing keyboard, mouse and VGA monitor
  • Core 2 Duo processor at 2.2GHz
  • 4Gb RAM
  • 160Gb Hard disc
My thinking behind the purchase is roughly as follows:
  • I have run various versions of Linux on one core of a not-much-more-powerful iMac quite successfully in the past. All versions I have tested have run much more smoothly than Windows in the same virtual machine set-up
  • These PC's can be sourced very cheaply secondhand (mine was £75, delivered) as companies upgrade their XP based networks
  • Being designed for enterprise use, most components can be easily accessed and swapped out if the need arises
  • There is no licensing cost associated with any of the software I anticipate installing
  • I intend to use the machine for batch processing, not graphics intensive GUI work, if large jobs need more time to complete, then so be it. 

Monday, 10 September 2012

Letting ImageMagick do the heavy lifting

Sometimes, as the files from our digital cameras get ever larger, we find that we don't need such huge files, and need to make a set of smaller images. Think of it as a set of proof-prints for the post-film world.

There are plenty of applications which will do this - iPhoto, Picasa and any number of things supplied with the camera. Trouble here is that the GUI is not really necessary in this case. There will be some performance penalty to be paid for loading thumbnails of the images, and it is likely to be a more than one-click operation.

If you know exactly what you want to do, then this is more easily accomplished in ImageMagick. For instance, I have recently had the need to perform the following steps, repeatedly on several sets of images:
  • Get the image from a locally mounted server directory
  • Make a copy
  • Resize the copy and drop the JPEG quality a bit
  • Turn it upside down
  • Save it into a new folder
To do this in ImageMagick is simple. Unusually for me, this example is in DOS, but a *NIX version would be much the same. In the directory where your original files are held:

for %A in (dir *.JPG) do convert -resize 1500x1500 -rotate 180 -quality 70 -verbose "%A" "path\to\the\resized\images\%A"

And then hit return. Quoting out the paths helps with images with spaces in the names, and the "verbose" switch ensures you have some output on screen. 

Tuesday, 30 August 2011

What is the Barrow Kipper?

Really good series of short videos leading up to the opening of the New Walk Museum's Dinosaur Gallery this weekend. Even better, there are preshistoric marine reptiles and fossils as well. Having seen the "Barrow Kipper" on the traffic island, I'm looking forward to seeing the real thing!


Sunday, 31 July 2011

"Disappearing acts"

Nice series of photo slideshows from The Guardian about heritage crafts:

Thursday, 16 June 2011

Hacking work

"Benevolent hackers see the future and pull us toward it."

http://www.amazon.co.uk/gp/product/0670919500/


Friday, 18 March 2011

Wednesday, 9 March 2011

Focus 2011

Returned earlier this evening from my annual visit to Focus on Imaging, which fortunately for me is held in Birmingham, so is easy to get to.

Just a few notes for now, perhaps more to come in a future post:

  • My general feeling is that the industry is settling down again now after the turbulent times of the last few years - the film/digital war is over, and the megapixel-race is now a steady climb.
  • There seemed to be more interest this year in continuous lighting kits based on CFL (continuous fluorescent light) technologies, both for beginning users and high end pro work.
  • Kits and accessories for modifying the light from compact flash-guns (e.g. "Speedlites") were also popular, as people look to improve the results they can get with their existing flashguns. This might also be called the "Strobist-effect"
  • There are now plenty of services who will take your digital files, and take them right through to a printed book output. Or, you can print your own in-house using any one of a number of inkjet printers
  • Conservation storage for both new and old photographs was also covered, courtesy of Timecare.
  • A service called "Lab Direct" from Ilford that offers digital prints on "proper" black-and-white paper. A good example of old meets new. My sample print even had that wonderful smell of hypo (sodium thiosulphate)....
  • Some truly superb cameras from Linhof and Cambo utilising the newest digital backs and large format lenses. Unfortunately, impressive resolution also brings with it an impressive price.

Tuesday, 15 February 2011

Sitting on the .DOC of the bay....


Seems I have a lot of files in various word processor formats (doc, docx, wp, etc) which I would like to turn into one unified format, and since editing will not be required in the future, I choose PDF.
Now it would be perfectly possible to 'print-to-PDF' using Mac OS X, and for a small number of files that would be fine. Alternatively I could use OpenOffice's PDF export function. However I got to wondering if there was a solution that could be used by people who have no access to any PDF functionality in their operating system.

Turns out there are plenty of "PDF servers" available, which would make sense for larger organisations. However it is also possible to use OpenOffice from the command line to do the same thing. Here's how:

  • I already have a version of OS X Snow Leopard, which will give me the Terminal access I need. Java is also installed and up-to-date, as is the latest version of OpenOffice
  • First we start OpenOffice in "headless" mode using Terminal:
iMac:~ simon$ /Applications/OpenOffice.org.app/Contents/MacOS/soffice.bin -headless -nofirststartwizard -accept="socket,host=localhost,port=8100;urp;StarOffice.Service" &

Don't forget the ampersand at the end - it returns control of the terminal to the user after the service has started.
  • Use grep and netstat to check it is running
iMac:~ simon$ ps aux | grep soffice
simon 1810 42.4 1.2 515704 49620 s000 S 1:14pm 2:27.21 /Applications/OpenOffice.org.app/Contents/MacOS/soffice.bin -headless -nofirststartwizard -accept=socket,host=localhost,port=8100;urp;StarOffice.Service simon 1789 0.0 1.1 514160 47400 ?? S 1:13pm 0:01.07 /Applications/OpenOffice.org.app/Contents/MacOS/soffice.bin -headless -nofirststartwizard -
accept=socket,host=localhost,port=8100;urp;StarOffice.Service simon 45573 0.0 0.0 252104 88 s000 R 1:20pm 0:00.00 (soffice.bin) simon 45571 0.0 0.0 2435116 524 s000 S+ 1:20pm 0:00.00 grep soffice

iMac:~ simon$ netstat -an | grep 8100
tcp4 0 0 127.0.0.1.8100 *.* LISTEN
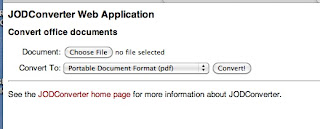
  • Now it is necessary to find something that will allow us to interact with the service. I found JODConverter, which can be downloaded from http://www.artofsolving.com/opensource/jodconverter. A version is available which includes a bundled version of Apache Tomcat server.
  • I had to change the default port from 8080 to 1234, as I had something already running on 8080, but there are clear instructions within the package on how to do this.
  • Now we simply run the startup.sh script in the /bin directory:
iMac:bin simon$ ./startup.sh
Using CATALINA_BASE: /Users/simon/Downloads/jodconverter-tomcat-2.2.2
Using CATALINA_HOME: /Users/simon/Downloads/jodconverter-tomcat-2.2.2
Using CATALINA_TMPDIR: /Users/simon/Downloads/jodconverter-tomcat-2.2.2/temp
Using JRE_HOME: /System/Library/Frameworks/JavaVM.framework/Versions/CurrentJDK/Home
  • Now we can find the web application at http://localhost:1234/
  • Simple - a web based PDF conversion that anyone can use! For the more terminally-minded amongst us, there is also a JODConverter Java application which can convert a whole load of files at once, in one go.

Saturday, 29 January 2011

Open Source Organiser

Just found this - it's an open source planner for paper-based people!

http://www.diyplanner.com/templates/official/beginner

Sunday, 17 October 2010

Quote for later

'The data storage model is clean, simple, and easy to learn, as is the programming model. SimpleDB excels at storing semi-structured data where the items (rows) are similar but not necessarily identical to each other."

Saturday, 2 October 2010

Computer rental - £0.20 per day!


Another novel solution to running Windows applications when you are primarily Mac based - simply borrow someone else's computer. Only this computer was located in America, and I was in the UK.

The solution lies in using Amazon's suite of web services, appropriately enough called "Amazon Web Services". By loosely following this guide, I was able to boot a Windows 2008 server, remotely connect to it using CoRD, carry out the work I needed to do and then return the server resources to the cloud, for others to make use of.


A quick calculation suggests that typical running costs could be as low as 20p a day, or one pound a week, and I have no extra hardware to look after. A very cost effective solution for small jobs, or one-off tasks.


Tuesday, 21 September 2010

DIY easel

Just found this - no time or space or tools to make one at the moment, but worth a try I think.

ISO standards for Museum Imaging

http://www.cdiny.com/ArticlesWhitePapers/ISO%20Standards%20for%20Museum%20Imaging_cdi_v1.0.pdf

Still to read this in full, so will comment on it more later.....

Sunday, 5 September 2010

Photographic scales

Quite often, I need to use a scale in an image. I have a few that I have designed myself, but I always like to know what is out there, so here are my "notes to self" on the subject:

I found the best results were to be had on archaeological suppliers websites, and also, which shouldn't really have come as a surprise, forensic scene of crime websites.

I particularly like these engraved plastic scales
And there are also some self-adhesive scales available too
These scales are mostly for archaeological use
Here is a blog post to some simple scales
And here is another post to a nice scale, complete with instructions for perspective correction

Thursday, 6 May 2010

Photographing bugs.....

http://strobist.blogspot.com/2010/05/lighting-bugs-with-layers-of-genius.html

Strobis carries an article today about Charles Krebs and his microphotography - nice to see incredible results coming from modest equipment. Note the use of focus stacking software in the later part of the clip.
Also, his own website is at:

with loads of information.
And here's my bug photos:


Fimomouldensis goggleyeyedun
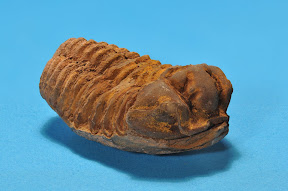
Calymene blumenbachii - taken with focus stacking software - not bad for a first attempt!

Tuesday, 30 March 2010

Really nice website

One of the privileged parts of my work is being allowed to mark accession numbers or inventory numbers onto historic objects. The actual process is not really a part of this post,but the process is carefully designed to cause minimal disruption to the object, and in any sizeable collection is virtually essential to know exactly which axehead, fossil shell or teacup you are looking at.

For all but the tiniest object, I prefer to use a traditional "dip" or "stylus" pen for the ink layer. They're easy to get hold of, inexpensive, and the nibs, being removable are easy to clean (the ink contains a shellac binder which tends to clog if allowed to dry).

I have a bit of a thing for nice pens, pencils and paper, so thought I would share this little website with you. It does everthing that you could ask of a website - tells me about the products, what they are for, how they are used and where I can get hold of them.

http://www.calligraphy.co.uk/

A well thought out, simple and informative web site. I've just bought some of their nibs, so I will try to do a sequence of photos demonstrating how I use them the next chance I have.
Update: The DP6H nib is winning for inventory marking at the moment. I'm also finding that Methanol is a good solvent for the ink at the end of the session, and it's not quite so unpleasant to handle as the acetone either....

Thursday, 25 March 2010

Mac to Windows, and back

Anyone who has worked with me for more than a few hours will know that I am very much a dyed-in-the-wool Mac user. Suffice to say that I've been using Macs since before they were trendy, and I still remember when the trademark Apple logo was filled with multicoloured stripes.

Since then a lot has changed, and there are now many more Mac users than there used to be, but it is still a fact of life that much of the world still runs Windows. Until now I have managed to get along fine, either using Mac equivalents of particular pieces of software, or by borrowing a PC here and there. This time however, it was much easier to have access to my own copy of Windows where I could call the shots on what software was running. I needed to go computer shopping....

What PC to buy? Well, there are lots of makes out there, and of course, Macs now run on Intel processors as well - which means that they can run Windows. And for those that don't follow the world of computers as closely as I do, there is no hacking, cracking or patching involved - it's an Apple supported modification, and is really thoroughly documented on their website.

Eventually I had narrowed it down to two options. Either buy a cheap, kronky second hand PC and deal with all the problems that would come with it, or spend more money and get a Mac which I would then install Windows on as well. To cut a long story short, the iMac arrived this morning.

I needed a brand new copy of Windows so I popped out to get this, downloaded the documentation and set to work with the Bootcamp software. All in all a very painless process and a couple of hours later I had a fully functioning dual-boot machine which lets me select which OS I want to use with just the press of a key at startup.

So I now have the best of both worlds - I can run pretty much any software that I need, and I can choose the working platform that is most comfortable and effective. If I'm doing any training work, then the client can choose the one they feel most comfortable with. I'm not going to say anything about the merits of either system, except that I won't be giving up MacOS just yet....

Thursday, 18 March 2010

Stereophotographs - no special goggles needed

Neat little tutorial shows taking stereoimages of small specimens
with simple equipment.

http://fossilprep.org/Stereo.html

Stereo-postcards, anyone?